IntelliComp Motion Compensation Setup
This guide provides information on how to install, setup, and use the Sim Racing Studio IntelliComp Motion Compensation with OpenXR Motion Compensation and OpenVR Motion Compensation.
IntelliComp does not require the WitMotion Sensor. In order for IntelliComp to work, you must have OpenXR Motion Compensation or OpenVR Motion Compensation installed.
Motion Compensation removes a motion platform's movements by changing the communicated position of a VR Headset before the VR image is rendered. This will allow the VR image to remain firmly in the seat or cockpit when racing or flying instead of being moved outside of the car or cockpit when the motion platform has a large amount of movement. This will increase the immersion and improve the actual feeling of motion while in VR.
- Note: The Sim Racing Studio IntelliComp Motion Compensation will compensate platform movement on the Pitch, Roll, Yaw, Sway, and Surge axis for actuator and non-actuator platforms. Heave is not compensated at this time.
- All DOF Reality and actuator based platforms supported by Sim Racing Studio will work with IntelliComp.
For OXRMC Troubleshooting, please utilize this article: https://support.simracingstudio.com/hc/236481942/20/openxr-motion-compensation-troubleshooting
For OVRMC Troubleshooting, please utilize this article: https://support.simracingstudio.com/hc/236481942/10/openvr-motion-compensation-troubleshooting
IMPORTANT: This guide will cover basic setup of OXRMC or OVRMC using the new IntelliComp feature in Sim Racing Studio.
For YawVR users, adjustments of the Motion Compensation settings will need to be performed within the OXRMC-MotionCompensation.ini file for OpenXR Motion Compensation or the User Interface in Steam for OpenVR Motion Compensation as the Sim Racing Studio Motion Compensation page does not adjust settings for YawVR platforms. Use the links before for more information on adjusting the Motion Compensation settings.
For more detailed instructions on using OXRMC, please visit the github page here: https://github.com/BuzzteeBear/OpenXR-MotionCompensation
For more details on using OpenVR Motion Compensation, please visit the OVRMC website here: https://ovrmc.dschadu.de/
Topics include:
Requirements
Installing OpenXR Motion Compensation in Sim Racing Studio
Initial Sim Racing Studio Configuration
Configuring OXRMC Settings
Creating an Activate and Recalibrate Center Shortcut
Launching OXRMC
OXRMC Graphic Overlay
Adjusting SRS Motion Compensation Settings
OXRMC Center of Rotation Save Location
Keyboard Shortcuts
Launching OXRMC
OXRMC Graphic Overlay
Adjusting SRS Motion Compensation Settings
Troubleshooting
Installing OpenVR Motion Compensation in Sim Racing Studio
Initial Sim Racing Studio Configuration
SteamVR Add-Ons and Overlays
Launching OVRMC
Configuring OVRMC Settings
Enabling Motion Compensation
Adjusting SRS Motion Compensation Settings
LPF Beta values and DEMA sample Settings
Keyboard Shortcuts
Tuning Motion Compensation
Requirements
The following items are required to use SRS IntelliComp Motion Compensation:
- SRS Premium Add-On Subscription for the SRS Base License
- OpenXR Motion Compensation (OXRMC) or OpenVR Motion Compensation (OVRMC)
Sim Racing Studio Premium Add-On Subscription
A Sim Racing Stuidio Premium Add-On Subscription is required to enable MotionComp in Sim Racing Studio. A SRS Premium Add-On Subscription can be purchased here or from within SRS by going to SETUP > License and clicking the Premium purchase button. This add-on subscription enables SRS to continue development on new and experimental projects and provides additional features including:
- Joystick Telemetry Maker
- Premium Shaking Effects
- Mobile Companion to access SRS from Phone or Tablet
- Pro-Tune Profile Downloads
- Cloud Tune Sharing and Importing
- Intellitune WIzard for Motion Platforms
- Cloud Backup and Restore
Note: A SRS Base License is also a requirement as the SRS Premium Add-On Subscription is just an add-on to the Base License. You can find more information about the differences here.
Installing OpenXR Motion Compensation in Sim Racing Studio
To install OXRMC:
1) Open Sim Racing Studio and navigate to the SETUP > Hardware page.
2) Click on the Install button in the OpenXR Motion Compensation section
3) Click on the latest version at the bottom of the page to download and install OpenXR Motion Compensation:
4) Once downloaded, install OpenXR Motion Compensation, accept the license agreement, and utilize its default installation location to avoid issues.
5) Once installed, you may read the readme file to have a better understanding of OpenXR Motion Compensation.
6) Please click the Refresh icon and/or close and restart Sim Racing Studio if not showing as installed. OpenXR Motion Compensation will now show as installed.
7) Next, click on the Install button next to SRS OpenXR Tracker. This will configure OpenXR to use the SRS Intellicomp Tracker.

8) Once the Install button is selected, it will change to a Configured state. Note: If it doesn't show configured after clicking Install, please click the Refresh icon and/or close and restart Sim Racing Studio.

Sensor Setup
IntelliComp uses the SRS OpenXR Tracker for OpenXR Motion Compensation. No physical tracker is needed.
1) To set Sim Racing Studio to utilize IntelliComp, use the pull-down menu in the SENSOR section and select

2) Scroll down to the SETTINGS section. The SENSOR section as it will be adjusted in the Adjusting Sim Racing Studio Motion Compensation Settings below.
OpenXR Motion Compensation Settings
1) In the SETTINGS section, in the Seated Height (mm)field, enter the number 1. OXRMC will handle the calculation of the height automatically; however, you will still need to at least enter the number 1 in the Seated Height (mm) field for Sim Racing Studio. 
IMPORTANT: Do not enter any value higher than 1 in the field or OXRMC will not compensate properly.
2) For Actuator Platforms only, insert the distance from the center of your vertical actuators from left to right and from front to back in the respective fields. Also enter the stroke in millimeters for your vertical actuators and your surge actuator if available.

IMPORTANT: When finished making changes, click SAVE at the top right in Sim Racing Studio.

Keyboard Shortcuts to Toggle the OXRMC Overlay, Calibrate the Center (Neutral Pose), and Activate OpenXR Motion Compensation
In order to calibrate and activate OXRMC, you will need to use keyboard shortcuts you can access while in VR. These shortcuts will allow you to activate a OXRMC Graphic Overlay (Virtual Tracker) in VR that you can see when Calibrating the Center (Neutral Pose) in VR. The Overlay will only appear in VR when you activate it via a shortcut key.
The default shortcut keys for OpenXR Motion Compensation are:
Toggle the OXRMC Graphic Overlay (Virtual Tracker) is CTRL+D
Calibrate Center (Neutral Pose) for OXRMC is CTRL+DEL
Activate OXRMC is CTRL+INS
These shortcuts can be rebound to different keys via the OpenXR-MotionCompensation.ini file. This might be necessary if the OXRMC keybinds conflict with keybinds you have in a specific game.
If these shortcuts need to be changed, it can be done so in the OpenXR-MotionCompensation.ini file file's fields below:
; GENERAL
; (re)activate and deactivate motion compensation
activate = CTRL+INS
; (re)set reference pose for tracker
center = CTRL+DEL
; VIRTUAL TRACKER
; toggle overlay display on/off
toggle_overlay = CTRL+D
More information on creating keyboard shortcuts can be found in the Keyboard Shortcuts section below.
Voice Commands
When using OXRMC shortcuts, you will hear an automated voice notifying you of what shortcut was pressed. This should include Overlay Activated, Overlay Calibrated, and Motion Compensation Activated/Deactivated.
Initial Setup and Calibrating the OXRMC Center of Rotation (COR)
In order for OXRMC to correctly compensation the VR image, you have to provide the information on where the Center of Rotation (COR) of your motion rig is positioned and which way is forward. This can be done with the following steps:
- Calculate, measure or estimate the distance between your headset and the Center of Rotation of your motion rig in forward/backward, up/down and left/right direction (This is typically near the bottom of the seat in the platform; however, it may be different based on the platform) in centimeters (cm).
This would be from the center of your head to the center of rotation of your platform.
The motion platform's center of rotation is defined as the point around which the platform is rotated. This is a point in space in which primarily pitch and roll rotate. Take into account all potential motion of your platform and where the center point of rotation would be floating in space. If in doubt, activate the Test Motion function in Sim Racing Studio and move your platform on the Pitch and Roll access to visualize where the Center of Rotation would be. - Enter the offset values in the OpenXR-MotionCompensation.ini file in the [tracker] section as seen below. Note: The values below are an example and the measurement that should be utilized is in centimeters (cm). Measure and utilize the correct values in cm that you obtained from Step 1 above.
 Note: The Virtual Tracker can also be moved and re-positioned while in VR. Utilize the following keyboard shortcuts to position the Virtual Tracker manually if required which can be found in the OpenXR-MotionCompensation.ini file:
- Save the OpenXR-MotionCompensation.ini file and close it.
- Start the OpenXR game of your choice
- Ensure the motion platform is in a neutral position
- Sit in your your motion platform
- Put your HMD on and face forward (this will be the direction when accelerating/surging forward).
Note: Potential rotation of the HMD on the roll and pitch angle is ignored for the calculation - Issue the Toggle OXRMC Graphic Overlay command (default is CTRL + D). This will activate the Virtual Tracker in VR. The Virtual Tracker might be located in VR that is behind, below, or above you when it is first turned on and might be difficult to see.
- Issue the Calibrate Center (Neutral Pose) command (default is CTRL + DEL).
- If you setup the Center of Rotation offsets correctly, you should see the Virtual Tracker appear in VR at the location specificed by your measurements (Usually down near the bottom of your seat or down slightly in front of your seat) if you are looking straight forward in VR when you issue the command.
Note: You want to be looking straight forward when issuing the Calibrate Center command as it will impact the direction the Virtual Tracker is facing. If you are looking to the side or slightly off center, then Motion Compensation will not work correctly as it is not calibrated correctly. Always ensure you are looking straight forward and utilize the Calibrate Center command often if your VR image becomes uncalibrated or if you turn SRS off and then back on. - Once the Virtual Tracker is pointed and located in the correct position, activate OXRMC by using the Activate Command (default is CTRL + INS).
Launching OXRMC after Initial Setup
- Make sure the game your using OXRMC motion compensation with support OpenXR -or- you are using OpenComposite
- Start the game
- Center the in-app view
- Bring your motion platform to neutral position
- Reset the ingame view if necessary
- Press the
activateshortcut (CTRL + INSERT by default). This implicitly sets the neutral reference pose for the tracker
- If necessary you can recalibrate the tracker by pressing activating the graphic overlay (CTRL + D) and then the
centershortcut (CTRL + DEL) while the motion rig is in neutral position. - You can increase or decrease the filter strength of translational and rotational filters in the OpenXR-MotionCompensation.ini of the image is swimming or laggy using the following keyboard shortcuts found in the OpenXR-MotionCompensation.ini file:

Keyboard Shortcuts
Keyboard shortcuts can be edited in the OpenXR-MotionCompensation.ini file, usually located at "...\Users\*<Your_Username>*\AppData\Local\OpenXR-MotionCompensation" to activate/deactivate or re-calibrate motion compensation during game-play.
Note that all keys and values in the configuration file(s) are case sensitive. That means all keyboard shortcuts must only contain capital letters, numbers and/or underscores
- shortcuts: can be used to configure shortcuts for different commands (See the OXRMC Keyboard Bindings at the bottom of this guide valid values):
- activate- turn motion compensation on or off. Note that this implicitly triggers the calibration action (center) if that hasn't been executed before.
- center - recalibrate the neutral reference pose of the tracker
- translation_increase, translation_decrease - modify the strength of the translational filter. Changes made during runtime can be saved by using a save command (see below).
- rotation_increase, rotation_decrease = see above, but for rotational filter
- offset_forward, offset_back, offset_up, offset_down, offset_right, offset_left - move the center of rotation (cor) for a virtual tracker. The directions are aligned with the forward vector set with the center command. Changes made during runtime can be saved by using a save command (see below).
- toggle_overlay - (de)activate graphical overlay displaying the reference tracker position(s) (See Graphical overlay for details).
OXRMC Graphic Overlay
You can enable/disable the overlay using the toggle_overlay shortcut. It displays a marker in your headset view for:
- The current neutral position of the reference tracker. Note that the position of the marker does not represent the Center of Rotation position prior to calibration
- For the SRS virtual tracker, the neutral position corresponds to the center of rotation currently configured. The marker uses the following color coding:
- blue points upwards
- green points forward
- red points to the right
- if blue and red are pointing in the opposite direction, try setting
upside_downto 1 in thestartupsection of the config file of the corresponding application (or check if it is set to 1 inadvertently).
- For the SRS virtual tracker, the neutral position corresponds to the center of rotation currently configured. The marker uses the following color coding:
- The SRS virtual tracker position, if motion compensation is currently active. This marker uses:
- cyan instead of blue
- yellow instead of green
- magenta instead of red
Adjusting SRS Motion Compensation Settings
SRS Motion Compensation should now be working. You will now need to finalize your settings and test motion compensation in Sim Racing Studio.
You will be observing how well the motion compensation is working in VR while at the same time adjusting the settings in the SENSOR section of the Motion Compensation page below.

During testing, you will need to turn Off the Roll, Sway, and Surge motion compensation settings. Do this by using the On / Off switches next to each axis: 
During testing, you might need to REVERSE an axis in motion compensation. Do this by using the Normal / Reversed switches for each axis: 
The Factor sliders are utilized to fine tune the amount of motion compensation used on the Sway and Surge axis. For platforms that do not have dedicated sway movement/actuators, sway is converted into roll. For platforms that do not have dedicated surge movement/actuators, surge is converted into pitch.
Sway Factor is the amount of motion compensation that is applied to the Sway axis. The higher the amount, the more compensation is utilized. This slider can be reduced to negate any potential over or under compensation which will result in inaccurate movements in the VR image for Sway. If the sway movement is not matching what is seen in the VR image, try reducing the Sway Factor.

Note: SRS IntelliComp does not compensate for Heave at this time.
Surge is the amount of motion compensation that is applied to the surge axis. The higher the amount, the more compensation is utilized. Similar to sway, if the surge movement is not matching what is seen in the VR image, try reducing the Surge Factor.
Horizontal Factor (For actuator platforms with horizontal surge actuators only) is the amount of motion compensation that is applied to the horizontal surge axis similar to the Sway Factor and Surge Factor as listed above. If the surge actuator is reversed on your platform, utilize the Normal / Reversed button to reverse the surge motion compensation.

IMPORTANT: When finished making changes, click SAVE at the top right in Sim Racing Studio.

SRS Keyboard Shortcuts
You can program Sim Racing Studio shortcuts for most of the SRS Motion Compensation commands. Click on the Keyboard icon on top right of the Motion Compensation page in Sim Racing Studio. It is suggested to set a Keyboard button for the ‘Motion Compensation Switch’. This will make it easy to stop Motion Compensation in Sim Racing Studio so you can compare the difference with and without it working.

OXRMC Troubleshooting
For troubleshooting assitance with OXRMC, please see the article here: https://support.simracingstudio.com/hc/236481942/20/openxr-motion-compensation-troubleshooting
Installing OpenVR Motion Compensation in Sim Racing Studio
SteamVR Installation
If you do not already have SteamVR, go here to install it. Click on the 'Play Game' button to begin the installation process. Note: SteamVR is required for OVRMC to work.
1) Open Sim Racing Studio and navigate to the SETUP > Hardware page.
2) Click on the Install button in the OpenVRMotion Compensation section:

3) Click on the latest version at the top of the page to download and install OpenVR Motion Compensation:

4) Once downloaded, install OpenVR Motion Compensation, accept the license agreement, and utilize its default installation location to avoid issues.
5) Once OpenVR Motion Compensation is installed, it will change to a Installed state. Note: If it doesn't show Installed after clicking Install, please click the Refresh icon and/or close and restart Sim Racing Studio.
6) OpenVR Motion Compensation is now installed and will display the status for all three items as Installed:
Sensor Setup
IntelliComp uses the Virtual Tracker in OpenVR Motion Compensation. No physical tracker is needed.
1) To set Sim Racing Studio to utilize IntelliComp, use the pull-down menu in the SENSOR section and select
2) Scroll down to the SETTINGS section. The SENSOR section as it will be adjusted in the Adjusting Sim Racing Studio Motion Compensation Settings below.
OpenVR Motion Compensation Settings
1) In the SETTINGS section, in the Seated Height (mm) field, enter the distance in millimeters from the bottom of your seat (under the pads) to your eye level. This helps in determining the offset of how high you are sitting and where the HMD will be located. If a measurement is unobtainable, utilize the default of 1000 since it will work in most instances. The value range can be from 1 to 1200.

2) For Actuator Platforms only, insert the distance from the center of your vertical actuators from left to right and from front to back in the respective fields. Also enter the stroke in millimeters for your vertical actuators and your surge actuator if available.
IMPORTANT: When finished making changes, click SAVE at the top right in Sim Racing Studio.
SteamVR Add-Ons and Overlays
Now that the IntelliComp Sensor and OVRMC is successfully installed, you must verify that OVRMC and Sim Racing Studio are active in the SteamVR Add-Ons and Startup Overlay Apps. You can do this now or later when you are about to Configure the OVRMC Settings below.
Open SteamVR
Go to Settings
Go to Startup / Shutdown
Select MANAGE ADD-ONS
Make sure 00vrmotioncompensation and simracingstudio are listed and shown as ON. Note: OVRMC in SteamVR shows up at 00vrmotioncompensation and SRS Motion Compensation shows as simracingstudio.
Next select CHOOSE STARTUP OVERLAY APPS
Ensure that VR Motion Compensation is turned On


If everything has been setup correctly, you should see a SRS Virtual Tracker (blue hexagon with a T) listed as a tracking device in the SteamVR window as shown below.

Launching OVRMC
There are two options on how to configure the settings within SteamVR for OVRMC:
Option 1) Utilize a VR controller while in SteamVR to make changes to OVRMC
Option 2) Utilize a startdesktopmode.bat file that will allow you to make adjustments to OVRMC on your desktop instead of in VR. (This method has been reported to often not work or crash SteamVR. It is HIGHLY recommended to use Option 1)
Both methods will still require you to wear your HMD to see the Virtual Tracker in VR. The choice only determines how you will interact with OVRMC when making the changes either with Option 1 by using a VR controller while in VR or with Option 2 by using your mouse and keyboard on your desktop while in VR.
Note: Due to the buggy nature of the startdesktopmode.bat file's tendency to crash SteamVR, its recommended to utilize Option 1 when possible.
Option 1:
1) Launch SteamVR and activate your VR controller
2) Use the menu button on your controller to access the SteamVR Dashboard
3) Select the GEAR icon in the bottom left to launch OVRMC
IMPORTANT: You will need to initially launch OVRMC like this EVERYTIME you want to use SRS Motion Compensation.
4) Proceed to Configuring OVRMC Settings

Option 2:
1) Go to the install location of OVRMC which is located at: C:\Program Files\OpenVR-MotionCompensation
2) Open the file "C:\Program Files\OpenVR-MotionCompensation\startdesktopmode.bat"
IMPORTANT: It is strongly suggested that you make a shortcut on your desktop to this file as you will need to run this file EVERYTIME you want to use SRS Motion Compensation.
Note: Though easier to launch, the .bat file can be buggy. If SteamVR continues to crash, try Option 1 instead.
4) Proceed to Configuring OVRMC Settings
Configuring OVRMC Settings
1) Select ‘SimRacingStudioVirtualTracker 1.0.0.1 (Tracker)' as your reference tracker if it’s not already selected.

2) Select the Settings button in the lower right to begin adjustment of the Virtual Tracker

3) When using Option 2, put on your VR HMD if you have not yet done so.
4) Once in SteamVR, you will need to exit SteamVR Home if active to see the Virtual Tracker.
a) Use the Menu button on your controller to access the SteamVR Dashboard
b) Select the Menu icon in the Bottom Left (3 horizontal lines)
c) Select EXIT STEAMVR HOME
d) Close the SteamVR Dashboard

You are now in an open VR space with the OpenVR Motion Compensation Settings menu in front of you with the Virtual Tracker somewhere around you.

The Virtual Tracker (which is a Blue, Red, and Green Cross) will be located somewhere in this virtual space and you must look around to find it. It might be far behind, above, or below you. Here is how it appears far away over your left shoulder when looking back:

Here is the Virtual Tracker very far away below you (Red arrow is pointing to it - Click image to enlarge):

This is the Virtual Tracker directly in front of you:

Note: If you are unable to locate the Virtual Tracker, go to Sim Racing Studio and repeat Step #5 in the Initial Sim Racing Studio Configuration section. This should place the Virtual Tracker nearby.
The SRS Virtual Tracker represents a center of rotation on you platform in order to calculate how to compensate for the change the position of your HMD when your platform moves. This guide will utilize the bottom of your seat as the center of rotation.
The center of the Virtual Tracker (where all 3 lines meet in the middle shown in the image below via the large red arrow) should be placed at the height of the bottom of your seat. This ensures it will work correctly based on the measurement of the Seated Height (mm) settings from Step #7 in the Initial Sim Racing Studio Configuration section.

The Virtual Tracker should also be placed in the middle of where your body is positioned so the Green Vertical Y lines goes directly through the center of your body out the top of your head.
To move the Virtual Tracker, you will utilize the + or - buttons next to X, Y, Z, and Yaw in the Offsets for Virtual Driver section.

X is left and right. Y is up and down. Z is forward and backwards. Yaw rotates the Virtual Tracker.
Note: The direction the Virtual Tracker moves for X and Y may not be straight forward/backward left/right as it might be moving at an angle relative to your position; however, in general the direction will still follow the X and Z axis.
Note: You can hold the buttons down continuously to change the values (which is very slow) or manually enter positive or negative values to quickly move the Virtual Tracker a large distance in VR space. You can change the values in VR by clicking on the number and a virtual keyboard will appear to make the change.


As you change these values, the SRS Virtual Tracker will move in VR space.
To place the Virtual Tracker correctly, use the following guidance:
The BLUE arrow (Z) should point directly FORWARD towards the front of the motion platform, directly through the center of your body, with the center of the Virtual Tracker level with the Bottom of your Seat.
Rotate the Yaw axis until the Blue arrow (Z) is pointed FORWARD towards the front of your platform.
The RED arrow (X) should point to the LEFT, directly through the center of your body, with the center of the Virtual Tracker level with the Bottom of your Seat
The GREEN arrow (Y) should point straight UP, directly through the center of your body, with the center of the Virtual Tracker level with the Bottom of your Seat.
The final position of the Virtual Tracker should have its center at the bottom of your seat, centered in your body, with the Blue arrow pointed forward.
This is an image of the Virtual Track when looking straight down in VR in the final position (Note: It is extremely difficult to get a full 2D image in VR, but take note of the floor grid-line at the Blue arrow (Z) pointing forward).

This is how the Virtual Tracker looks when looking straight down in iRacing with the Blue arrow pointed forward in the correct position with the VR Dashboard active.

This is how the Virtual Tracker looks when looking down and to the left in iRacing with the Red arrow pointed to the left in the correct position with the VR Dashboard active.

This is how the Virtual Tracker looks when looking straight up in iRacing with the Green arrow pointed up in the correct position with the VR Dashboard active.

The position of the Virtual Tracker will be saved automatically as you make the adjustments, so it only have to be done once.
LPF Beta values and DEMA sample Settings
If your LPF Beta values are different than 1.0000, change them now to 1.0000 as this is the default setting.
If your DEMA sample values are not 2, change them now to 2 as this is the default setting.
These values are utilized for physical trackers like the Valve Index Controller or HTC Vive Tracker and should not be needed for the Virtual Tracker. However, if there are issues of a swimming or laggy image, they might need to be adjusted. See the Troubleshooting section at the bottom of this guide for more information.
Keyboard Shortcuts
Once all the settings are complete in OVRMC, it is suggested you set hotkeys. You can set keyboard hotkeys for the "Reset Reference pose" shortcut to the same key as your VR center/reset keybindings in your games so it will all reset at the same time when needing to recenter/calibrate your VR image. You can also set a Keyboard hotkey for enabling motion compensation. This can be done once in a game and before entering a vehicle.

When you are done making changes in Settings, select the back arrow in the upper left next to Settings to head back to the main menu in OVRMC.

Enabling Motion Compensation
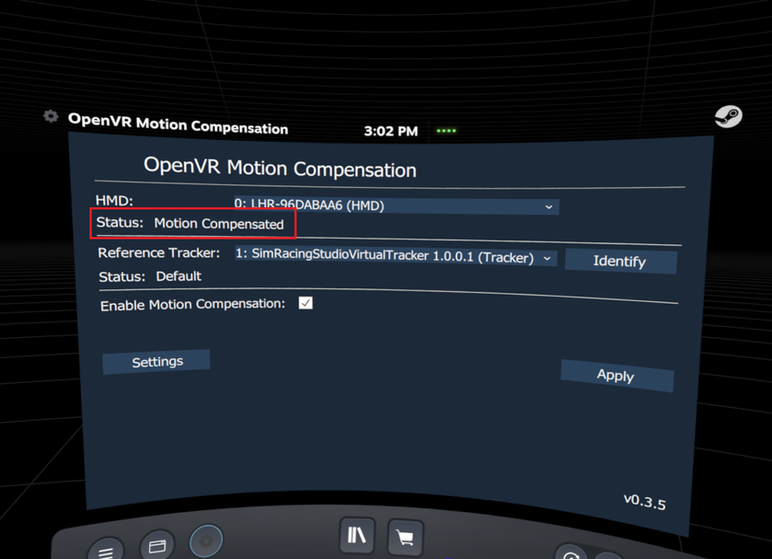
To enable Motion Compensation, first check the box next to Enable Motion Compensation:

Next, click the Apply button:

When active, you will see the message "Motion Compensated" in the HMD Status field: